~ How To Projects ~
Making Sock Puppets
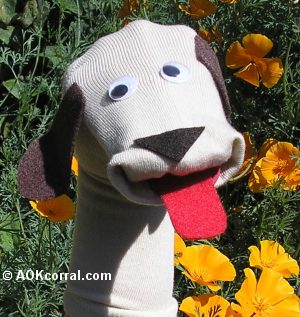
Learn how to make these cute sock puppets into all kinds of fun animals. Making sock puppets is a great project for young girls just learning to craft.

Click below for more
Craft Projects and Patterns
|
~ Projects By Theme ~
- Animals
- Seasonal
- Holidays
Get this entire project
WITHOUT
Ads, Banners, Logo or Margins
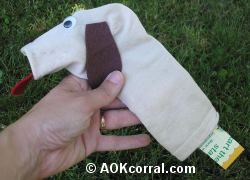
The PDF Version contains instructions and patterns for all animals shown in our photo.
Purchase the Ad Free / Easy Print PDF Version for only $1.49

|
|
How to Make Sock Puppets
~
August 2011
|

|
You may Print this page as it is ...OR...
Purchase the Easy Print Version for $1.49
The Easy Print PDF Version contains instructions and patterns for all the animals shown; cow, sheep, horse, giraffe, mouse, snake, and dog without margins, ads or logos.
|
|
|
- Socks in any color or size (for our patterns size 8-10 is best and a crew length or more to cover your wrist and some arm)
- Sewing pins
- Sewing needle
- Sewing thread in colors matching socks
- Cardboard cereal box
- Gluing Base & Mouthpiece Pattern
- Red craft foam for mouth
- Felt (for animal ears, tongue, etc..)
- Wiggly eyes or buttons for eyes
- Hot glue and glue gun
- Scissors
- Permanent markers for drawing on the socks
- Other optional items; yarn for hair, chenille sticks, etc..
|
Part of our sock puppets require that you can hand sew a basic up and down stitch. Although the decorating of the puppets can be done by older kids, the base of the puppet should be done by an adult or someone who can sew a basic handstitch.
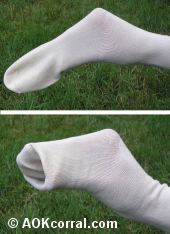
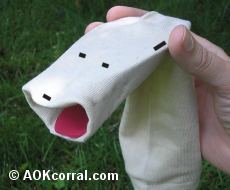
- Have some sewing pins available for this step. Place the sock on your hand with the heel of the sock at your knuckles and the toe hanging out beyond your fingers.
- Open your hand so that your thumb is below your other fingers as if opening a puppets mouth.
- Using your opposite hand, push the sock toe between your thumb and fingers, toward the palm of your hand creating a mouth-like opening for the puppet
- Put a couple pins through each side of the puppets mouth to hold the mouth position. (see photos)
- Without changing the position of the mouth, carefully take the sock off your hand.
- Thread your sewing needle with a thread matching the sock. (photo example shows a contrasting color for easy viewing)
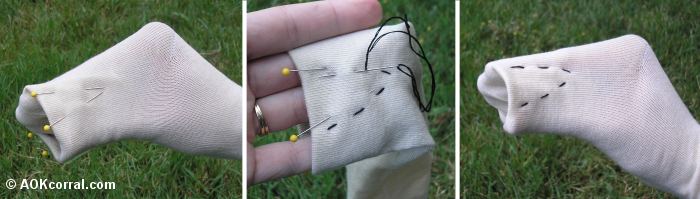
- Using an up and down stitch, stitch a simple triangle at each side of the puppets mouth as shown in the photos.
- Put your hand back into the puppet and get your marker. Make marks at the locations for the eyes, nose, ears, and other parts of the animal you are making. Take the puppet off your hand.
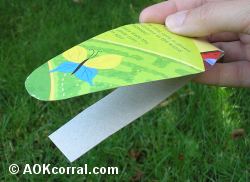 
- Using the pattern provided for the gluing base cut out the gluing base from a cereal box. Fold where the rectangular part meets the rounded part.
- Put the gluing base inside your sock puppet so the thin half goes into the bottom of the mouth, and the fat half goes into the top of the mouth. (Depending on the size of your sock, you may have to adjust the size of the gluing base by cutting the ends a little. It does not need to be a perfect fit, but it should fill the areas of the puppet where you will need to glue parts onto the face and mouth.)
- Cut out and prepare all the pieces needed for the animal you are making. (Our Easy Print PDF Copy contains patterns and instructions for all the animals shown in the photo.)
- Heat up your glue gun.
- Slip the foam mouthpiece into the puppet mouth without glue first to make sure it will fit correctly. It should fit inside the puppet's lower mouth with the front edge of the foam, at the front edge of the puppets lower mouth. Remove and trim if needed.
- Add hot glue to one side of the mouthpiece and insert it into the mouth, then quickly press down into place.
- Glue the eyes, nose, and tongue if you have one onto your puppet. Depending on what type of animal you are making, you may want to pull the cardboard gluing base out and put it back in sideways so you have a flat surface to glue against for the ears that are attached on the sides of the head, such as a dog like ours.
|
You may Print this page as it is ...OR...
Purchase the Easy Print Version for $1.49
The Easy Print Version includes instructions and patterns for all the animals shown; cow, sheep, horse, giraffe, mouse, snake, and dog without margins, ads or logos.
|
|
|
|
|


