~ How To Projects ~
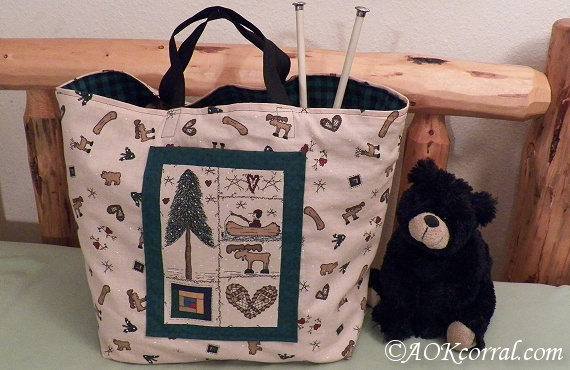
Tote Bag Sewing Pattern
Learn how to make your own tote bag with our easy sewing pattern and tutorial. Great tote bag for ongoing craft projects or to use as a shopping bag.

Click below for more
Craft Projects and Patterns
|
~ Projects By Theme ~
- Animals
- Seasonal
- Holidays
Get this entire project
WITHOUT
Ads, Banners, Logo or Margins
Purchase the Ad Free / Easy Print Version for only $1.49

|
|
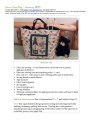
Tote Bag Sewing Pattern
~
January 2015
|
- Fabric for tote bag ¾ yard (Some fabric will be left over for pocket appliques if desired.)
- Fabric for tote bag liner and matching pocket 1 yard
- One yard of 1 wide cotton or poly webbing (often used to make belts)
- Sewing thread to match fabrics
- Tape measure
- Fabric marking pencil
- Sewing pins
- Iron & Ironing board
- Sewing Machine
- (Optional: additional fabric for applique pocket decoration and Heat n Bond for applying appliques)
|
Base of bag measures 12 x 7 and height of bag is 13
This bag is flexible making it great for storing and carrying projects like knitting, crocheting, quilting, and sewing. This bag also works great as a reusable grocery bag or shopping bag as the base is made to be the same size as a standard grocery store paper bag.
- Cut 2 pieces of tote bag fabric measuring 20 x 17.5 (If your fabric is directional, cut your pieces so that 20 is horizontal side to side, and 17.5 is vertical top to bottom)
- Cut 2 pieces of liner fabric measuring 20 x 17.5
- Cut 1 piece of liner fabric measuring 11 x 8 for front pocket
- Cut 2 pieces of webbing for handle strips, each measuring 15

- Fold and press a hem of ½ on the top edge of the pocket.
- Fold 1 more on the top edge of the pocket and press again.
- Stitch the top hem into place close to the first folded edge.
- Fold and press a hem of ½ on the bottom edge and then each side edge of the pocket.
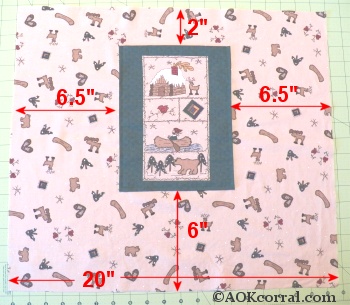
- Position the pocket on one of the tote bag body pieces as shown in the diagram. Pin into place.
- Stitch the pocket onto the tote bag, leaving the top open.
- Pin the front and back of the tote bag right sides together and edges even.
- Stitch with ½ seam allowance around sides and bottom of bag.
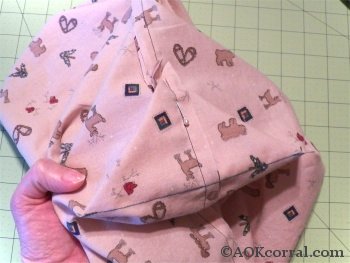
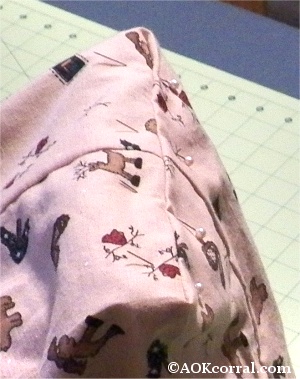
- With a side seam facing up, place your hands into the bag and your fingers in the corner. Spread the fabric from the corner by moving your palms and arms apart slightly to form a triangle. Lay the fabric bag down on your table without losing the triangle shape and with the side seam centered.
- Measure across the triangle to find the point where it is 7 from edge to edge and mark edges.
- Draw a line from one mark to the other.


- Measure the distance from the top of the triangle to your line. It should be approx. 3.5.
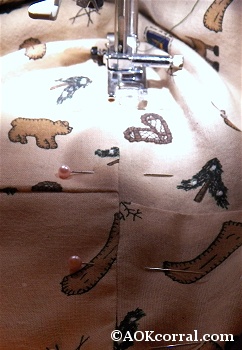
- Pin the triangle in place and then stitch across the line. (There should only be two layers of fabric being stitched together. Be careful not to catch other parts of the bag in your stitching.)
- Repeat steps 3 through 7 again for the other side.
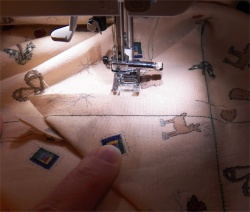
- Fold the triangle at its base toward the bottom of the bag. *Lay it flat against the bottom and pin into place being careful not to catch any other layers of the bag. (*Tip: It is easiest to put your hand into the bag at the side seam and extend your thumb and forefinger into the corners at the base of the triangle, then just let the triangle fall against the bottom of the bag. Use your other hand to slip a few pins in to hold in place. Then lay down to adjust if needed.)
- Stitch the triangle to the bag bottom with a seam line that is about 1 ½ to 2 from the tip of the triangle.
- Repeat the last two steps with the other side of the bag. Turn the bag right side out.
- Follow steps 1 through 10 for the bag liner as well.
- Press a ½ hem around the top edge of the tote bag.
- Press a ¾ hem around the top edge of the tote bag liner.
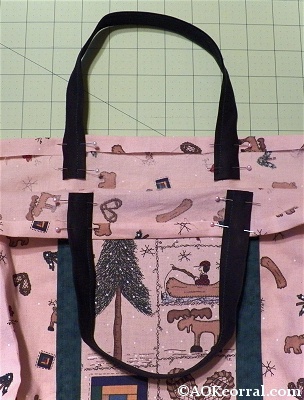
- Take one of the 15 handle strips and position the outside edge at 6.5 or just above the pocket edge. Adjust the strip so that the end is about 1 ½ is below the top hem edge. Pin in place.
- Before pinning the other end in place, see that your handle is not twisted and that the same edge that is facing out (toward the bag side) is also facing out on the other side. This will create a nice hold at the top of your handle. Position the end to 1 ½ from the top hem edge and pin into place.
- Repeat with the other handle.
- Stitch the handle to the bag around all edges of the handle strip end pinned to the bag. (This will create a visible rectangle of stitching on the outside of the bag so choose a color of thread that will match.)
- Repeat with all handle ends.
- Put liner into bag: Tote bag should be right side in, and liner should be right side out so that both wrong sides will be together.
- *Line up the side seams and pin the liner to the bag, the liner should be pinned 1/8 to 1/4 inch lower than the top edge of the tote bag. (*Tip: Start pinning at a side seam and end at a side seam so that you can adjust the seam if necessary for a good fit.)
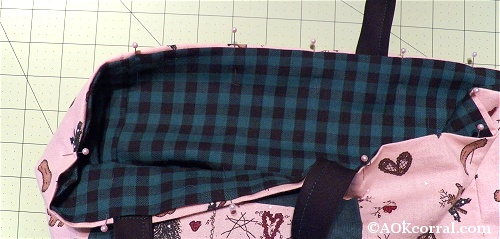
- Shake the bag while holding the top edges to help the lining settle into position. Push the liner corners into the bag bottom corners to check for a good fit.
- Stitch the liner and bag together, close to the liner edge, all around the top of the bag.
- Put your hand into the bag at the side seam and push the liner corners into the bag corners again so they are together and also check that the bag seams joining the corners are also together. While your hand is still in the bag, use your other hand to place pins along the seam from one corner to the other, making sure to catch both the liner and the bag in the pins.
- Stitch the bag and liner together along the seam between the bottom corners being careful not to catch any other parts of the bag.
- Repeat these steps on the other side of the bag.
|
Project
Options:
|
1.) Read or Print this project from our website, as is, for free.
|
2.) Purchase Easy Print Version - Download NOW:
- Convenient - NO ads, menus, or margins - Save ink and paper
- Complete - All instructions & patterns for this project
|
|
|
|
|


