|
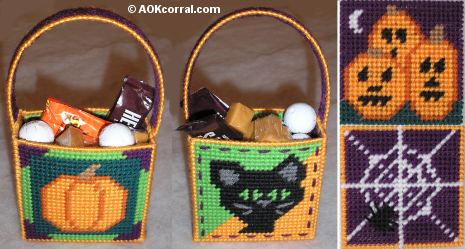
Treat Bags
~
October 2007
|
These projects are for your personal use only and may not be republished or copied.
Spider Web and Jack o'Lanten patterns are only available on our Easy Print PDF Version.
|
You may print this page as is or...
Easy Print Option:
Includes all patterns and instructions for this entire project without margins, ads or logos.
Bonus: The PDF Version includes the Spider Web and Jack o'Lantern patterns
|

|

|
|
-
1 Sheet of 7-count Plastic Canvas for each treat bag you make.
-
Regular Yarn
-
Large Eyed Needle
-
Sharp Scissors
-
Treat Bag Patterns
Purchase pre-cut plastic canvas squares (approx. 4") OR Cut your own squares from sheets. Either way they should be 27 squares wide and 27 squares high.
|
This project requires that you already know how to stitch on plastic canvas. If you need help...
Front & Back: Cut 2 square pieces that are 27 squares wide and 27 squares high.
Sides & Bottom: Cut 3 rectangular pieces that are 11 squares wide and 27 squares high.
Handle: Cut 1 long piece that is 65 squares long and 4 squares wide.
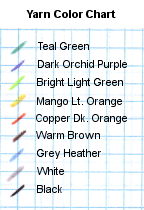
 All yarn colors used are regular "Red Heart" yarns except for the "Mango Lt. Orange" which is "Caron" Yarn.
- Front, Back, Sides & Bottom: Stitch the pieces by following the treat bag patterns.
- Handle: Use the cutting guide above to cut the handle piece and then fill in all the squares with stitches in your choice of color. (You can do long stitches like those done in the center of the side pattern if you wish.) Next, pick a contrasting color and loop stitches through each of the squares and around the outside edge of the handle piece to create a soft edge on the handle.
- Use the yarn color of your choice when joining the pieces.
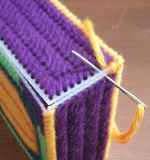
- Start with either the front or back piece and line up the holes along one side with one of the side pieces.

- As you begin, secure the end of the yarn by sliding it under several stitches on the back of one of your pieces and near the corner where you will begin.
- Start at one corner hole and bring your needle through from the wrong side.
- Next, go through the adjacent hole in the other piece from the right side through to the wrong side.
- Continue joining the piece by looping through each pair of holes in this manner. Secure the end of the yarn as you do when stitching.
- Stitch all the pieces together in this way.
- To finish the top edges of the bag, loop stitches through each of the squares and around the top edge of the bag to create a soft edge on the bag.
- Center the ends of the handle at the top of each side of the bag and stitch into place.
|
|
Do you like this project? Would you like to see more like it?
What kinds of projects to you like?
Please Tell Us
If you enjoy these free projects, please support our website by shopping our Craft Bazaar
or by purchasing the AD Free/Easy Print PDF Version above.
To View other Projects go to Project Library Page
|


