~ How To Projects ~
Stuffed Chicken Patterns
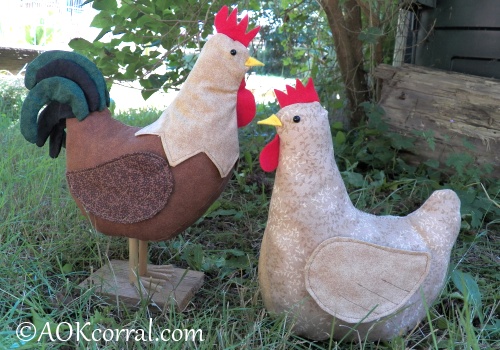
These patterns make a fun and decorative stuffed chicken set. Our stuffed chickens are made using regular cotton fabric and can be a standing rooster or laying hen.

Click below for more
Craft Projects and Patterns
|
~ Projects By Theme ~
- Animals
- Seasonal
- Holidays
Get this entire project
WITHOUT
Ads, Banners, Logo or Margins
Purchase this pattern for only $2.49

|
|
Stuffed Chickens
~
March 2010
These projects are for your personal use only and may not be republished or copied.
|
|
You may print this page as is or...
Easy Print Option:
Includes all patterns and instructions for this entire project without margins, ads or logos.
|
|
|
|
- 1/3 Yard of body color fabric
- Small scraps of similar color for wings
- Red and yellow felt scraps
- Fiberfill Stuffing
- Small (6mm) black doll eyes
- Sewing thread slightly darker than wing fabric and yellow for beak
- Sewing needle
- Sharp sewing scissors
- Pins
- Sewing Machine, Iron and ironing board
-
Hen Pattern Pieces
Rooster patterns and instructions available on PDF Version
|
The hen's finished measurement is approx. 9 1/2" tall, 7 1/2" long and 4" wide.
The rooster's finished measurement is approx. 12 1/2" tall, 11" long (with tail) and 4" wide.
(Note: The instructions that follow are for the hen. The rooster is a different pattern and is only shown on the PDF version.)
Cut out all the pieces for the hen and make markings as indicated on each pattern. To make markings use either, a erasable marking pencil or stitch a thread marking that you can pull out.
- With right sides together, stitch two wing pieces together leaving an opening as indicated on the pattern
- Trim off corners and make cuts into the seam allowance every ½ inch around curves
- Turn the wing right side out. (Tip: Use the eraser end of a pencil to help push all the sewn edges of the wing out completely)
- Turn the seam allowances of the opening into the wing and press with your iron all around the wing edges
- Edge stitch the wing (To edge stitch; stitch very close to the outside edge all around)
- Using the marks from the pattern as a guide, stitch lines for the wing feathers
- Lay out one side of the body, right side up, and pin the comb and wattle into position.
- Stitch the comb and wattle onto the body piece about 1/8 inch from the edge, remove the pins.
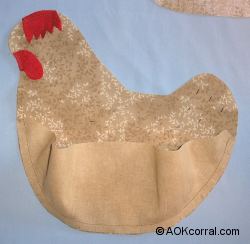
- Take the same body piece and match up the edges of the body bottom with the edges of the body, right sides together. Carefully pin the pieces together working from the front around to the back.
- Stitch the pieces together and remove pins. (photo 1)
 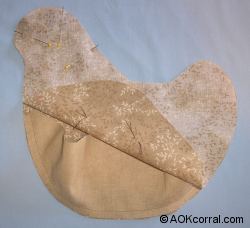
- Next, lay the same body piece in front of you with right side facing up.
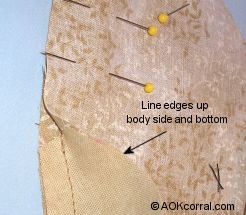
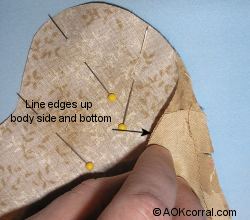
- Now, with right sides together, begin to pin the body pieces together starting with the head and working toward the chest. Continue pinning the pieces together matching edges until you reach the place where the body bottom piece is attached. (photo 2) At this point, begin to match the edges of new body piece with the raw edge of the body bottom. Be careful not to catch anything but the edges in the pins. (photos 3 and 4)
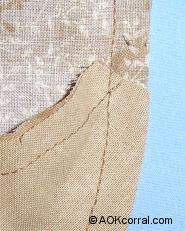
- After you have finished pinning the pieces together, stitch the pieces together being careful not to catch any other parts of the chicken in your stitching. (photo 5)
- Trim off corners and make cuts into the seam allowance every ½ inch around curves
- Turn the chicken right side out.
- Make tiny holes at the location point of the eyes. Add and secure the eyes to the chicken.
- Stuff the hen with Fiberfil stuffing starting with the head and working around to the tail. (To help the chicken stay upright you may choose to put a baggie of beads in the bottom of the chicken for extra weight. Stuff the head and neck enough to make them firm.)
- Stitch the opening in the chickens body closed with a needle and thread making very small stitches.
- Hand stitch the beak onto the chicken just above the wattle.
- Tack the wings onto the hen with small stitches between the hens body and the layer of fabric on the inside of the wing.
|
|
|


