~ How To Projects ~
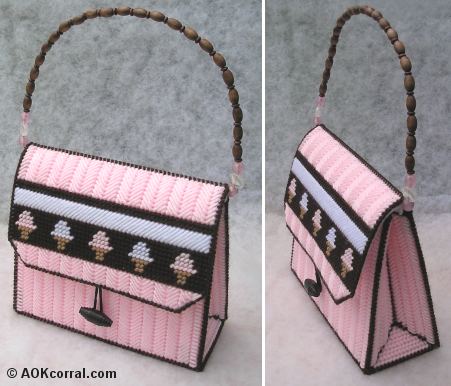
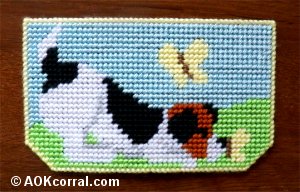
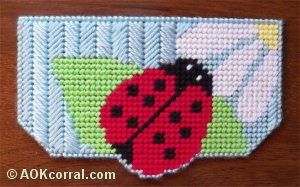
Plastic Canvas Purse
Make this plastic canvas purse for girls with these great patterns and instructions.

Click below for more
Craft Projects and Patterns
|
~ Projects By Theme ~
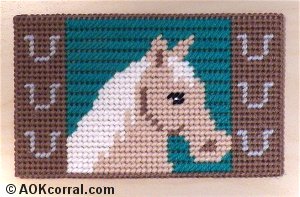
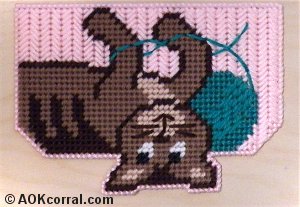
- Animals
- Seasonal
- Holidays
Get this entire project
WITHOUT
Ads, Banners, Logo or Margins
Bonus: The Easy Print Version contains all 6 purse cover patterns in additional to all purse instructions.
Purchase the Ad Free / Easy Print Version for only $2.49

|
|
Plastic Canvas Purse Patterns
~
July 2010
|
- 2 pieces of 10 ½ x 13 ½ inch, 7 count plastic canvas for each purse
- 3 pieces of felt in matching color for lining
- Soft Yarn in standard 4 ply thickness
- Large eye needle for yarn stitches
- Sharp scissors
- 16 gauge craft wire
- Needle nose pliers
- Assorted beads for the handle
- 20 plain, small ¼ inch beads (matching color is best)
- 1 small hair band
- 1 large button for closure
- Sewing needle and strong thread to match lining felt/fabric
- Sewing machine is used in creating the lining
- Additional Purse Cover Patterns, along with all purse instructions and patterns, available on Easy Print Version (see button below)
7 inches tall, 8 inches wide and 3 inches deep when opened
|
- Cut 1 - Back of the purse: 44 squares high and 50 squares wide
- Cut 1 - Bottom of the purse: 19 squares high and 50 squares wide
- Cut 4 - Sides of the purse: 40 squares high and 9 squares wide
- Cut 1 - Front of the purse: 40 squares high and 50 squares wide
- Cut 1 - Top Flap of the purse: 30 squares high and 50 squares wide
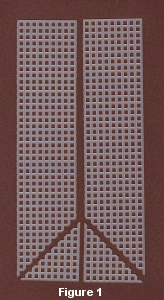
- Take one of the side pieces and your sharp scissors. Start at one of the corners and cut diagonally across the corner and through each of the following intersections until you have cut through the side piece. Do the same to each of the other side pieces. Keep the corners for the next step. (see figure 1)
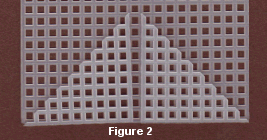
- Take two of the corner pieces that you cut off the sides and turn them so together they form a large triangle where the rough edges are facing out, left and right.
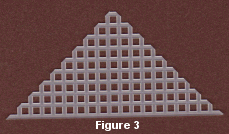
- Lay these two corner pieces, as a pattern, on top of another piece of plastic canvas so that together they form a large triangle with all the bottom edges even and leaving one square of space between the inner edges of the corner pieces. (see figure 2)
- Cut the new large triangle out of the additional piece of canvas. (see figure 3) Repeat to create a second larger triangle piece.
- Stitch all the pieces for the purse body, except for the top flap piece. The bottom of the purse should follow the up and down pattern used across the front and back. Click Here for Purse Body Patterns.
- Cut canvas for the top flap and stitch according to pattern directions. Click Here for Purse Top Flap Pattern.
- Finish the front edges of the purse top flap. (You will finish all edges except the edge that will connect with the back, the hinge edge.) Begin by securing your yarn near one of side top corners, then loop through each hole and over the outside edge all around the flap to the other top corner. Secure the yarn end.
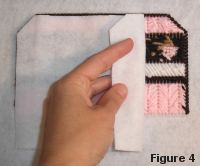
- Before adding the top flap to the purse you will want to use it to measure and cut its lining. To do this;
- Lay the top flap onto a piece of the felt.
- Make sure that there is at least 1 ½ inches of felt beyond the hinge edge of the top flap. (see figure 4)
- Cut the felt to be just inside the edges around the top flap, and leaving 1 ½ inches of extra felt beyond the purse hinge edge. Set the lining aside.
- Thread your yarn needle and large needle to begin joining the pieces.
- Join pieces in the following manner:
- Line up the holes of each piece that you are joining.
- As you begin, secure the end of the yarn by sliding it under several stitches on the back of one of your pieces and near the corner you wish to begin at.
- Start at one corner hole and bring your needle through from the wrong side.
- Next, go through the adjacent hole in the other piece from the right side through to the wrong side.
- Continue joining the piece by looping through each pair of holes in this manner.
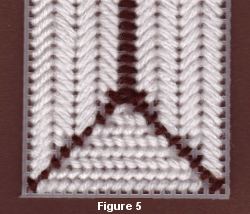
- First, join the shorter lengths of the sidepieces together.
- When you reach the end of the sidepieces, take the triangle piece and join it along the bottom of each sidepiece. (see figure 5) Check often to see that when you finish, the corner edges of both sidepieces and triangle line up as if they were one piece.
- Next, join the back piece to the bottom piece and then the front piece to the bottom piece.
- Now, join one of the completed sides onto the purse. Start your stitching at the top front and work around until you reach the top back. (Remember that the back piece has 4 additional squares in height so do not be alarmed when the back side does not meet up with the back piece.
- Join the other completed sidepiece onto the purse from top front, around to top back.
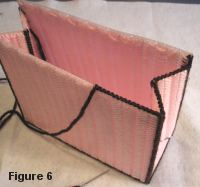
- Finish the top edge of the purse body. (You will finish all edges except the back edge that will connect with the top flap.)
- Begin by securing your yarn at the top corner of the back of the purse. Then, loop through each hole and over the edge all around the purse to the other top corner of the back of the purse on the other side. Secure the yarn end. (see figure 6)
- Join the top flap to the purse along the hinge edge by matching up the squares and looping your needle and yarn through each pair as you did when assembling the purse body. Secure the end.
- Find the center of the top flap piece.
- Using a needle and thread, attach the hair band to the wrong side of the top flap approximately 1 inch from the bottom edge.
- Best method to attach:
- In order for your stitches to remain invisible on the right side of the top flap, you will want to use a color of thread that matches the pattern color at the location you are attaching the hair band.
- The easiest way to attach it is to send your needle and thread through from the wrong side and leave 2 to 3 inches of the end of thread on the wrong side, then send your needle back through from the right side, in a different square. Place the hair band between the two ends on the wrong side and tie the ends of thread together in several knots. To strengthen, repeat a few more times.
- Hint: Be sure to do your stitch between the rows of ups and downs on the pattern so it will not be easily seen from the right side.
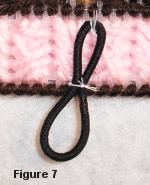
- Pinch the hair band together at the bottom edge of the top flap and use your needle and thread again to attach the hair band just inside the top flap edge using the same method as above. (see figure 7)
- Locate the position for the button on the front of the purse by closing the purse top flap and pulling the hair band down enough to create some tension. Notice the location of the bottom of the hair band and mark it with a pin. Check to see that your marked spot is centered and adjust if necessary.
- Take matching yarn and your yarn needle, attach the button to this location using the same method above.
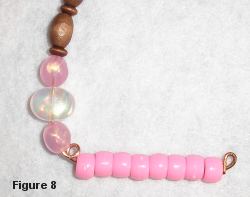
- Cut a piece of wire that measures, at least 20-22 inches long.
- Bow the wire so it forms a semi-circle then, bend the wire about 3 inches from one end at a right angle.
- Thread your handle beads onto the wire from the other end, leaving another 3 inches on that end without beads. Bend the wire at 3 inches from the end, again at a right angle.
- Next, add a 1/8 inch loop in the wire at each of the corner bends by using your needle nose pliers to twist the wire around. (see figure 8)
- Now, add some of your ¼ inch plain beads onto the remaining ends of the wire until there is only about ½ inch of wire left on the end.
- Using your needle nose pliers again, twist the last ½ inch of wire into a loop that will keep the beads securely on the wire.
 To attach the purse handle you will need to thread your yarn needle with the same color of yarn you used for joining the purse pieces together. Be sure to use a piece of yarn almost 5 times the width of the purse so that you will not run out of yarn before you complete the attachment.
- Open the flap of the purse and lay it down on its back so that the wrong side of the purse is facing up. Set the bent ends of the handle assembly onto the back (wrong side) of the purse with the twisted corners at the purse side edge. (see figure 9)
- Follow the diagram given below to stitch the handle onto the back of the purse.
- Start at the square labeled 1d and send your needle and yarn down that square hole. Leave about 2 inches of the yarn end.
- Then, stitch up through the square hole labeled 1u. Tie the threaded yarn with the 2 inch end in a secure knot over the handle assembly allowing the yarn to tighten down between the small beads to the wire.
- Trim the end and continue to follow the diagram by going down again at the hole marked 2d.
- Continue along the diagram following the number sequence doing down first, then up. Be sure to allow the yarn to tighten in between the small beads of the handle assembly whenever it is crossed.

- When you reach the other side, at 16d and 16u, finish off the end of the yarn with a secure knot and trim off excess yarn.
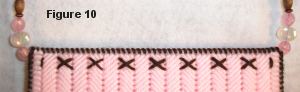
- When you turn the purse over and view the right side/back of the purse, you should have a row of xs evenly spaced across. (see figure 10)
- Cut your felt so you have 2 pieces that measure 11 inches wide and 8 inches tall.
- Using a ½ inch seam allowance, stitch both 8 inch sides (sides) and one of the 11 inch sides (bottom). Trim seam allowance close to stitching.
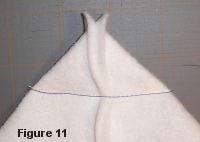
- At one of the corners, press the side seam against the bottom seam to form a triangle with the corner as the top of the triangle and a a base of 2 ½ inches across.
- Stitch across the base of the triangle. (see figure 11)
- Do the same to the other side of the lining.
- Trim the triangles off close to the stitching.
- Put the lining into the purse and adjust so that the bottom, sides and corners are against the purse and the top edge lines up with the top edge of the purse.
- Thread your needle with the thread color to match the color of your lining and knot the end.
- Stitch the lining to the purse body just under the top edge stitching* of the purse around the sides and front. (*between the end of the up and down pattern on the purse, and the top edge stitching of the purse). Each stitch should catch at least one line of the plastic canvas on the outside and be sure to catch the felt on the inside.
- To stitch the lining to the purse along the back side of the purse, catch the plastic canvas on the outside between each of the up or down stitching rows. Inside the purse, extend each stitch to the next up or down stitching row.
- Stitch the lining for the top flap last and stitch around the sides and front just as you did for the sides and front of the body lining, between the pattern and the edge stitching over at least one line of plastic canvas on the outside, and being sure to catch the felt on the inside.
- The top flap lining piece will extend down into the purse body and cover the handle assembly. Stitch the top flap lining to the back of the purse body in the same way you stitched the body lining onto the back of the purse, between each of the up or down stitching rows on the outside and extending to the next up or down stitching row on the inside.
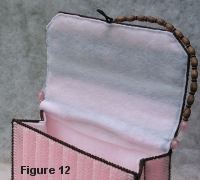
- Trim any felt edges that extend past the edges of the purse. (see figure 12)
|
Project
Options:
|
1.) Read or Print this project from our website, as is, for free.
|
2.) Purchase Easy Print Version - Download NOW:
- Convenient - NO ads, menus, or margins - Save ink and paper
- Complete - All instructions & patterns for this project + Bonus*
*This version includes all 6 purse cover patterns in additional to all instructions.
|
|
|
|
|


