~ How To Projects ~
Applique Picnic Patterns
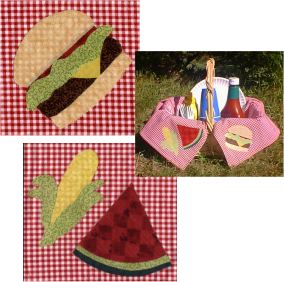
Use these cute picnic patterns to make a picnic basket liner or to decorate a picnic tablecloth.

Click below for more
Craft Projects and Patterns
|
~ Projects By Theme ~
- Animals
- Seasonal
- Holidays
|
|
Applique Picnic Basket Liner
~
July 2003
|
- Picnic Patterns (click on links below to print out pattern sheets)
- Misc. Calico Fabric colors/patterns (or other thin to medium fabric)
- Sharp Scissors
- "Steam-a-seam" Fusible Web or other (paper backed adhesive web sheet)
- Pencil
- Iron & Ironing board
Basket Liner Options:
- Either purchase a ready made small tablecloth or small finished cloth square like a table mat or large cloth napkin to decorate.
- Or make your own liner. To do this you will also need the following:
- Approx. 2 yards of fabric
- A Sewing Machine.
- Tape Measure & Pins
- (see directions below)
|
- Print the patterns from the links above.
- Decide which fabric colors you will use for each of the pieces.
- To make the appliqué pieces check the manufacturers directions on your fusible web and follow one of the methods given here.
- If using "Steam-a-seam" fusible web do the following:
- Trace the pattern onto the web side of the "Steam-a-seam" and peel off paper liner.
- Stick the "Steam-a-seam" to the wrong side of your fabric.
- Cut the "Steam-a-seam" and the fabric together along traced lines.
- Prepare all the rest of the pieces for appliqué in the same way.
- If using other fusible web that does not allow you to just peel the paper backing and stick do the following:
- On a flat surface, turn the fabric so that the right side is laying down and the wrong side is facing up.
- Lay the pattern pieces onto the wrong side of the fabric.
- Trace around each pattern piece with a pencil.
- After you have all the correct patterns drawn onto that fabric, cut around all of them to make one square. (Important: Do not cut out the individual pieces yet!)
- Cut out a piece of fusible web just a bit smaller than the square, but covering all your pieces.
- Follow the manufacturer's directions for applying the web to the fabric. Usually, that means placing the bumpy side of the paper against the wrong side of the fabric and going over it with a hot iron for 2 to 3 seconds.
- Leave the paper attached to the fabric and cut out the pieces. (You should be able to see the lines through the paper for cutting.)
- Remove the paper backing from the appliqué pieces.
- Prepare all the rest of the pieces for appliqué in the same way.
- At each corner of your basket liner cloth measure from the corner inward 6 inches and mark with a pin.
- Arrange the pieces of the design, as shown in the pattern, onto the liner cloth in the area below the pin.
- When each piece is correctly positioned, lay a thin cloth over the pieces and press a hot iron down onto the pieces and hold for 20-30 seconds.
- Add any additional layers of pieces, lay a thin cloth over the pieces and press with a hot iron again for 15-20 seconds.
- Follow the above steps for each corner design
- To make your own basket liner cloth first measure your picnic basket.
- Measure the inside of the basket from the top edge, down into the basket, across and up to the opposite edge of the basket.
- Measure the other direction of the basket by doing the same thing.
- Take your measurement numbers and add 6 inches to each measurement, that will be your dimensions for cutting out your fabric pieces. (For example, you measure 20 inches long and 15 inches wide; the your final measurements to cut fabric will be 26 inches long and 21 inches wide.)
- Cut out two pieces of your chosen fabric at the measurements you have established.
- Place wrong sides together and pin in place.
- Stitch (1/2" seam allowance), pivoting at corners, around entire square leaving an opening of about 6 inches along one of the four sides.
- Clip at corners.
- Turn right-side-out through opening and press along all edges.
- Edge stitch around the entire square to finish.
|
|
|


