~ How To Projects ~
Shoulder Tote Bag
and
Water Bottle Holder
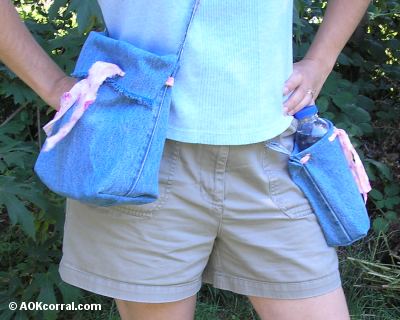
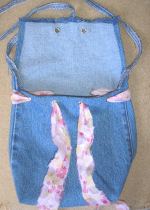
You can reuse a pair of old blue jeans to make these easy projects. Make the blue jean shoulder tote bag to wear over your shoulder as a lunch bag or tote. The matching water bottle holder for walking, hiking or when on the go.

Click below for more
Craft Projects and Patterns
|
~ Projects By Theme ~
- Animals
- Seasonal
- Holidays
Get this entire project
WITHOUT
Ads, Banners, Logo or Margins
*Plus Bonus: complete instructions to make the matching water bottle holder.
Purchase the Ad Free / Easy Print PDF Version for only $1.35
|
|
Shoulder Tote Bag
and
Water Bottle Holder*
~
August 2007
These projects are for your personal use only and may not be reprinted or copied.
|
(*Water Bottle Holder instructions only available on Easy Print PDF Version)
|
You may print this page as is or...
Easy Print Option:
Includes all printouts and instructions for this entire project.
*Plus Bonus: complete instructions to make the matching water bottle holder.
|
|
|
- One Pair of Blue Jeans:
( Size 12 long or larger with narrowing style lower legs )
- Fabric Scissors
- Tape Measure
- Needle and Thread (or sewing machine)
|
- Marking Pencil
- 18 Eyelets - size 5/16" (8mm)
- Tool to apply Eyelets and Hammer
- Your Favorite Ribbon, String, Cord or Lace
|
-
Lay out your pair of blue jeans on a table or the floor with the front facing up.
-
Cut one leg of the blue jeans off by starting your cut just below the crotch seam and then cutting straight across to the other side.

-
Starting from the cut edge, measure up each side of the leg to 11 ½ inches and make marks.
-
Turn the leg over. Starting from the cut edge, measure up each side of the leg again and make marks at 11 ½ inches and at 16 inches from the cut edge.
-
Turn the leg back over so that the front is facing up.
-
Cut the bottom hem off the lower leg right up against the seam.
-
Next, cutting through the front fabric layer only, cut close to the side seam from the lower leg opening, to the mark that you made and then 1 inch beyond the mark. (*Important: Be sure you do not cut the side seams or any of the stitching on the seam allowance because they will be the straps for your bag.)
-
Do the same to the other side seam on the other side of the leg.
-
Now, cutting through the front fabric layer only, cut from the mark on one side to the mark on the other straight across.
-
Flip the blue jean leg over and cut close to the side seam from the lower leg opening, past the mark at 16 inches to the mark that you made at 11 ½ inches and stop there.
-
Do the same to the other side seam on the other side of the leg.
-
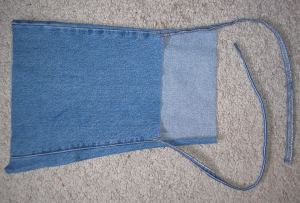
Now, cut from one of the marks at 16 inches, straight across to the mark on the other side at 16 inches. Your bag is now cut and ready to make.
-
Turn the bag inside out.
-
Stitch across the bottom of the bag at about ½ inch from the edge. (If you do not have a sewing machine, stitch a backstitch with needle and thread.)
-
With the bag still inside out, turn the bag so that one of the sides is facing you and the bottom of the bag extends *perpendicular to you. (*straight out in front of you)
-
Put your hand into the corner of the bag. Now spread out the bag starting from the corner and widening from there as far as it will spread. (You will notice that the corner forms the tip of a triangle when the side and bottom of the bag spread out.)
-
Grab hold of the triangle from the outside and set the corner down with the side of the bag facing down and with the bottom of the bag still extending perpendicular to you and the triangle you formed still intact.
-
Starting at the corner and extending perpendicular along the bottom of the bag, measure 2 and ½ inches and make a mark. Draw a line across the bag and along your mark so that the line forms the base of a triangle.
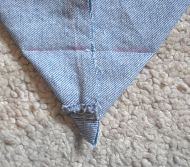
-
Stitch along the line.
-
Repeat steps 3 through 7 for the other side of the tote bag. The only extra thing you should do on the second side is to measure the length of the stitch line on the first side and check that the line you have made for the second side is similar in length. If not, you can move your line back or forward to get a similar length.
-
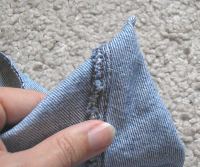
Fold one corner triangle toward the center bottom of the bag along the stitch line, then stitch the corner down with a needle and thread through all thickness of fabric.
-
Repeat on the other corner.
-
Turn the shoulder tote bag right side out.
Now you will finish the edges around the fold-over top flap of the bag.
-
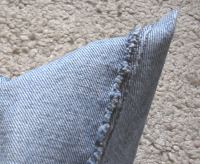
To make the front edge of the bags fold-over flap frayed slightly, pull out some of the fabric fibers along the front edge. It may come out a little uneven depending on your jeans so you can trim the fray a little if needed.
-
Next, to hem the sides of the flap, lay the bag out with the flap open.
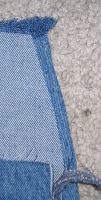
-
Fold one of the sides in toward the wrong side of the fabric starting with ¼ inch hem next to the blue jean seam/handle and becoming wider to about ¾ inch hem toward the frayed edge of the flap. (This will create a side edge that gradually narrows toward the frayed front edge of the flap.)
-
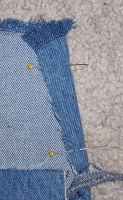
Pin the hem in place and backstitch along the side about 1/8 inch from the folded edge.
-
Trim the excess fabric from the hem so that there is only about 1/8 inch of unfinished edge beyond the stitching.
-
Repeat steps 3 through 5 for the other side of the fold-over flap.
Next, you will place the eyelets on the bag.
-
Turn the bag inside out again and lay it down so that the front of the bag is facing up.
-
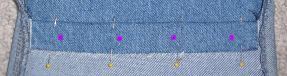
To finish the top edge of the front of the bag, fold 1 inch of the fabric down against the wrong side of the fabric pin to hold. (Previously, when you cut out the bag, you cut an extra 1 inch along the blue jean seam below the horizontal top edge. Use this 1 inch as the hem to fold over.)
-
Make a vertically centered mark 1 inch from the blue jean seam on each side edge of the hem.
-
Measure the distance between these two marks and divide that distance in half to find the center point of that distance. Make a vertically centered mark 1 inch from that center point in each direction.
-
Turn the bag on its side so you see half of the front and half of the back. Using the mark from the front of the bag as a guide of vertical position, make a mark on the back of the bag that is 1 inch from the blue jean seam and lined up with the mark from the front of the bag.
-
Turn the bag on its other side and do the same thing.
-
Lay the bag on its front so that the back is facing up.
-
Measure the distance between the two marks on the back and divide that distance in half to find the center point of that distance. Make a vertically centered mark 1 ½ inch from that center point in each direction.
-
Follow your eyelet tool directions to punch holes at the marks on the back of the bag and apply the eyelets (be careful not to catch any other part of the bag).
-
For the front of the bag, take the pins out and open the hem fold.
-
Punch holes at the marks on the hem of the bag.
-
Fold the 1 inch hem into place again and make marks through the holes to the fabric on the other side.

-
Open the hem again and punch holes at the marks on the other side of the fabric hem.
-
Fold the hem again. Match the holes in the hem with the holes in the fabric on the other side and follow your eyelet tool directions to apply the eyelets through both thicknesses of fabric. (This will also hold the hem in place.)
-
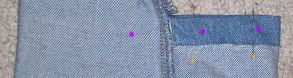
To apply eyelets onto the closure flap, measure the distance between the two side edges of the flap at ¾ inch from the frayed edge and divide that measurement in half to find the center point of the flap at ¾ inch from the frayed edge. Make a mark 1 inch from that center point in each direction.
-
Apply eyelets at these two marks.
-
Turn the bag right side out and cut a piece of your ribbon, lace or cord that measures approx. 36-40 inches in length.
-
Send the end of the ribbon through one of the eyelets at the center front of the bag from the outside in toward the inside and then weaving in and out through all the eyelets around the bag. Adjust the ribbon so that both ends are of equal length.
-
To tie the bag shut, close the flap over the bag opening and send the ribbon ends through the eyelets on the flap from the wrong side out to the right side. Tie the ribbon ends together.
-
Tie the two blue jean seam ends into a knot to connect the bags shoulder strap.
|
|
Do you like this project? Would you like to see more like it?
What kinds of projects to you like?
Please Tell Us
If you enjoy these free projects, please support our website by shopping our Craft Bazaar
or by purchasing the AD Free/Easy Print PDF Version above.
To View other Projects go to Project Library Page
|


