~ How To Projects ~
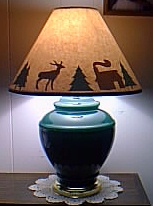
Lamp Shade Silhouettes

Click below for more
Craft Projects and Patterns
|
~ Projects By Theme ~
- Animals
- Seasonal
- Holidays
|

|
Lamp Shade Silhouettes
~
October 2000
|
- Any smooth surface lamp shade
- Kraft Paper (White is best)
- Glue Stick
- Scissors
- Pencil
- Light colored or White Cut-outs from card stock paper. (Check the scrapbooking area of your local craft stores for pre-cut shapes or use stencils on card stock paper to make your own.)
|
- Lay the kraft paper out on a hard flat surface.
- Lay the lamp shade onto the paper on its side. (Make sure you have enough room on the paper to roll the lamp shade on its side a full semi-circle.)
- With the lamp shade side seam against the paper, make a mark on the paper at the seam line. (If there is no seam line, make a mark on the shade instead.)
- Being careful not to reposition the lamp shade, start rolling the lamp while drawing lines your pencil against the top and bottom rims of the lamp shade.

- Continue rolling and drawing until you reach the side seam line again.
- Make a mark on the paper at that side seam line also.
- Connect all lines and carefully cut out the semi-circle shape. (You should have a semi-circle as shown in Photo 1)
- On the wrong side (the side that you drew the lines) plan your design with the shapes.
- Glue your shapes in place as shown in Photo 2, and let them dry completely.

- Wrap the paper around the lamp shade with the silhouettes facing the inside. (This step works best if you mount the lamp shade onto the lamp to hold it in place.)
- Overlap one end over the other to create your seam, make adjustments to fit and then glue the paper seam together.
- Some paper trimming may be necessary to finish the shade.
|
|
|


