 Please wait...Photos on this
page take a few moments to load.
More Projects available on
project library page.
Click Here
Please don't forget to Visit
our Craft and Gift Bazaar and enter to WIN in our latest giveaway!
 Fall
Holiday Table Settings.....Oct 1999
© Copyright 1999 by AOK Corral Craft and Gift
Bazaar. All rights reserved.
Stamping Project
Materials needed for Place Card,
Recipe holders:
-
Card Stock Paper (cut to measure 7
3/4" x 5 1/2")
-
Recipe cards or 3x5 cards (With your
favorite holiday recipe to share with your guests)
-
Contrasting paper and/or tissue colors
-
Fall Rubber Stamps
-
Stamping Ink, & Markers
-
Glue Stick
-
Stapler
Instructions for Place Card, Recipe
holders:
-
To form the Place Card recipe pocket,
fold to the inside 1 1/8 inches of one of the short ends of the card stock.
Connect no more than 1/4 inch of the side edges together using staples
or glue. ( If you use glue, make sure you only glue the very edge so that
the recipe card will slide into the pocket.) Allow glue to dry.
-
Fold the card stock in half, short
ends together.
-
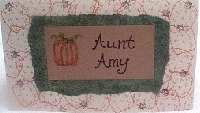
Decorate the front of the card with
stamps
-
Using contrasting tissue paper, tear
a rectangular piece approx. 4 x 2 1/2 inches and glue it, centered, onto
the card front.
-
Cut a piece of colored paper measuring
3 x 1 1/2 inches.
-
Decorate the colored paper with a small
stamp and write your guest's name.
-
Glue it, centered, onto the tissue
paper.
-
Decorate the pocket inside the card
with stamps.
-
Place the recipe card inside the pocket
and surprise your guests by sharing one of your favorite holiday recipes
with them.
Floral Project
Materials needed for Napkin holders:
-
Artificial flowers or leaves with stems
measuring 6" or longer. (9" preferred length)
Instructions for Napkin holders:
-
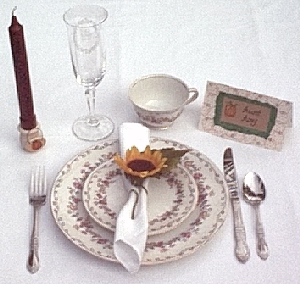
Holding the top of the flower in one
hand, begin wrapping the stem around two of your fingers.
-
Wrap it around up to two times with
the end of the stem always stopping in the front (where the face of your
flower is)
-
Bend the end of the stem so it points
straight down, away from the flower.
-
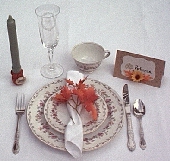
Adjust the flower top if necessary
so that when you look at your napkin holder, the flower is facing you and
the stem is pointing down. (see photo)
-
Slide your rolled napkin through the
coils of the stem and you are set.
Tole Painting Project
Materials needed for Candle holder:
-
Wood candlestick holder (If you will
be burning candles, use one with a wide base)
-
Small wood shapes or squares
-
Glue gun
-
Acrylic Paints
-
Brushes
-
Mixing Palate or Cardboard
-
Short Candles
-
Tracing & Carbon Paper, Pencil,
Tape (If you are going to use patterns provided. Click on the patterns
to get a printable copy.)
Instructions for Candle holder: 
-
Using a paint color that complements
your table setting, paint your candlestick holder. (I used ivory)
-
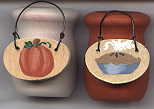
Trace the pumpkin or pie pattern onto
your small wood shape or square. (Or draw your own idea)
-
Paint the picture as follows:
-
For Pumpkin
-
Base coat: Mix a little Ivory with
Georgia Clay
-
Stem Base coat: Territorial Beige
-
Leaf Base coat: Hunter Green
-
Use straight Georgia Clay for the dark
shading on the pumpkin. On the left half of the pumpkin, paint a stripe
of Georgia Clay on the left edges of the pumpkin ribs. and on the right
side of the pumpkin, paint it on the right edge of the ribs, shade also
on the bottom of the pumpkin..
-
For the highlights add more Ivory to
your base coat color, then highlight the center of each rib. (Make your
highlights more toward the top of the pumpkin.)
-
Highlight the stem by adding a little
Ivory to Territorial Beige and light the left edge.
-
Highlight the leaf by adding a little
Ivory to Hunter Green and light the left edge.
-
Add thin curly strokes for pumpkin
vines.
-
For Pie

-
Base coat Mix for pie plate Ivory and
Indigo Blue. (Mix to desired color)
-
Base coat for pie Territorial Beige
-
White for pie steam
-
From your pie plate base coat, make
two other colors. Add a little more Indigo Blue for the shading color,
and a little more Ivory for the highlight color
-
Add shading to the left and right sides
of the pie plate.
-
Add highlights to the center.
-
For the pie highlights, add a little
Ivory to Territorial Beige and highlight the top of the pie, with a slight
downward stroke coming from the top center and spreading out around the
top of the pie.
-
Use straight Indigo Blue to lightly
add pie slits.
-
Use White and thin it with water, paint
thin curly lines from the top of the pie, upward.
-
Glue the small wood shape or square
to the front of the candlestick holder with the glue gun.
-
Add your candle and your ready.
You are ready to Entertain
with Handcrafted style for Fall Holidays or Any Day!
© Copyright 1999 by AOK Corral Craft and Gift
Bazaar. All rights reserved.
These projects are for your personal use only and may
not be reprinted or copied without written permission from AOK Corral.
To View other Projects go to
Project
Library Page
If you enjoy these projects, please
support our website by shopping our Craft Bazaar
Home


 Fall
Holiday Table Settings.....Oct 1999


