~ How To Projects ~
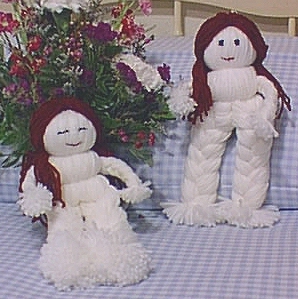
Easy Yarn Dolls
Make these adorable yarn dolls with our easy instructions. Great project for kids to make too.

Click below for more
Craft Projects and Patterns
|
~ Projects By Theme ~
- Animals
- Seasonal
- Holidays
Get this entire project
WITHOUT
Ads, Banners, Logo or Margins
The PDF Version contains all the instructions, photos and patterns.
Purchase the Ad Free / Easy Print PDF Version for only $1.49

|
|
Easy Yarn Dolls
~
March 2000
|
|
You may Print this page as it is ...OR...
Purchase the Easy Print Version for $1.49
The Easy Print Version includes all instructions for this entire project without margins, ads or logos.
The Easy Print Version is great for instructional use with a class or group. Print as many as you need for a simple handout.
|
|
|
- Yarn (any two colors)
- Scissors
- Books or Cardboard pieces with the following measurements from top to bottom:
- Large = 16 1/2 inches
- Medium = 9 inches
- Small = 7 inches
- Doll Makers Needle
- Black & Red Embroidery Floss
|
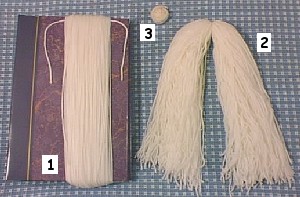
- Using the color you have chosen for the dolls body, cut a piece of yarn approx. 6 inches long to be the tie and lay it across the top edge of the large book. Wrap yarn around the book as shown in the photo at #1. Continue winding yarn around the book 200 times.
- Slip the wound yarn off the book and tie the 6 inch piece of yarn tightly around the wound yarn.
- Cut the opposite end of the wound yarn where it bends, so that you have what is shown in the photo at #2.
- Make a yarn ball that is approx. 1 inch in diameter. See the photo at #3.
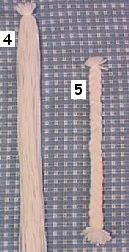
- Using the Medium book, wind the yarn around it as you did for the body, but only 50 times. (You will NOT need to place a tie along the top of the book)
- Slip the yarn off the book and cut along the bottom bend of the wound yarn.
- Tie together one end of the yarn, as shown in the photo at #4, about 1/2 inch from the edge.
- Braid the entire length of the yarn and tie together again, at about 1/2 inch from the edge. (Trim if necessary)
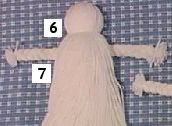
- Take the yarn ball and place it inside the yarn body, under the gathered, tied center.
- Smooth out the yarn evenly around the ball and gather it together under the ball. Tie the yarn together tightly to form the head. See the photo at #6.
- Divide the yarn below the head into two parts, front and back.
- Center the braided arm piece between the two parts as shown in the photo at #7.
- Tie the yarn together tightly under the arms to form the upper body.
- Divide the remaining yarn into two parts, left and right.
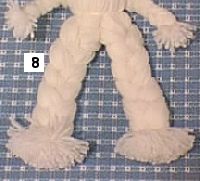
- Braid each side, gathering and tying the ends about 3/4 inch from the ends. See photo at #8. (Trim if necessary)
- To make the hair, use the Small book and place a 4 inch piece of yarn across the top edge of the book as you did for the body.
- Wind the yarn around 50 times.
- Slip the wound yarn off the book and tie the yarn together tightly with the 4 inch piece of yarn.
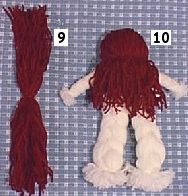
- Cut the opposite end of the wound yarn along the bend so that you will have cluster of long strands, tied in the middle. See photo at #9.
- Place the hair over the head with the gathered tie centered at the top.
- Use a doll makers needle and the hair color yarn to carefully, sew the hair in place at the top.
- Bring the needle and yarn down to one of the sides of the neck. (This should be done by sending the needle through the inside of the doll's head.)
- Loosely stitch over a small segment of the yarn hair along the neck, then another segment, then another, and so on until you reach the other side of the neck and the hair is secured evenly across the back of the neck as shown in the photo at #10.
- Tie off the end of your stitching yarn under the hair where it is concealed.
- Stitch a simple face using embroidery floss or you could even glue ready-made doll eyes and mouth on.
|
You may Print this page as it is ...OR...
Purchase the Easy Print Version for $1.49
The Easy Print Version includes all instructions and photos for this entire project without margins, ads or logos.
The Easy Print Version is great for instructional use with a class or group. Print as many as you need for a simple handout.
|
|
|
|
|


